In anticipation of the Dux Britanniarum game that I'm running, I decided that I need more terrain. While Dux Brit's terrain rules typically leave a lot of open terrain, I personally prefer a more realistic, densely populated table. I want to see forests that look like forests, villages that look like villages, and crops that look like crops. As you can see below, my previous game looked pretty nice, but it was by no means loaded with terrain.
With this in mind, I set out to make my vision for a beautiful table a reality. I've made trees for an orchard, a church and walls to contain it, a bunch of bushes, some thickets, some more buildings, and soon a vineyard. However, one thing that I didn't have was pine trees. While there are many types of pine trees, I decided to stick with only a couple different types: the fuller, Christmas tree style ones and the sparser more rounded spruce trees.
I knew that I wanted a lot of them, so I decided to get a bunch of cheaply made trees from China, via Ali Express. I figured that once the crappy flock was taken off of them, they could be made into something useful and more realistic.
So I promptly tossed them in a cup of water for a day or two and scraped off the junk flock, which left me with this (Very Messy! Do this into a box or garbage can!).
Not there yet, obviously. So I then trimmed them up with some scissors, really just hacking away at them to give them some more realistic shape (Note: This, again, is pretty messy, so work over a garbage can or have a broom handy or the grown-up in your like, in this case my girlfriend, will make you clean your room). Even the densest pine trees have those kind of under-cuts from branches, so I set about making them a reasonable approximation of what a pine tree looks like. Here they are after their trip to the barbershop.
Not content with that, I needed to get the base tree a more woody color, so I based them and sprayed them a dark brown. I typically go with a metal or plastic primer from Krylon or Rustoleum. They are cheap and pretty effective. After the dark brown, I then give them a dusting with a tan spray paint to "gray" them up a little bit. As most of you probably know by now, trees are actually brown most of the time, they are gray with a hint of brown. Here they are after their painting and dusting.
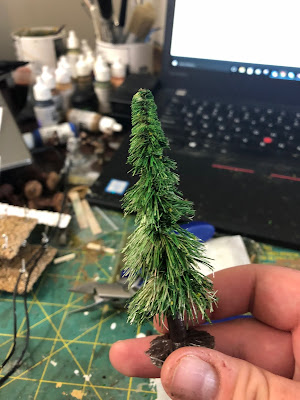
After that, the final bit. I just need to apply the static grass to the branches and base the tree. I won't bother with telling anyone how to base them, because I just glue a couple shades of static grass to my terrain. It's not the cheapest way to make terrain, but I prefer the look over flock, which looks too much like a golf course to me. For applying the static grass to the tree itself, I just used a cheap 2" hog bristle brush (My go to terrain brush!) and brushed on some pva. you can water it down slightly to save some money, but with how much I'm going to handle these trees, I wanted that stuff locked down! Once the glue was on, it was just a matter of using my brand new flock box from War World Scenics (Same place I got the flock) and choosing my desired color. I went with a couple different colors for some variation, not all pines are the same and some are dead! The flock box really helps nail the splayed needle effect that a lot of trees have, but if you want more flat needles you just need to skip the flock box and apply the static grass by hand. Here are some pictures of my finished results with a Footsore Late Roman converted to a Gondorian officer and also a couple shots of them on my Killing Fields terrain mat.
So that's pine trees! I'm going to try to double the number of trees I have on the table by the game, hopefully both pines and deciduous and I'm going to try to get in some variation with some smaller trees, bushes, and different types of trees. The added benefit? All of these pine trees costed me less than 15 USD! Until next time!


No comments:
Post a Comment